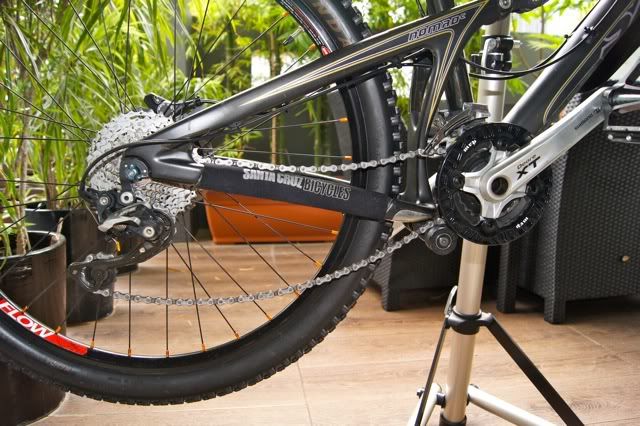
 The best way to see if your rear derailleur need major servicing is look for sign of slack chain when the bike engages the smallest gears for both the chain ring and the sprocket. Refer to the above photo, despite the installation of chain tensioner, the chain slacked like a dead noodle. The problem lies on the rear derailleur, where the spring tension has been weakened over time. The only way to rectify the problem was to overhaul the rear derailleur by dissemble the whole unit into pieces, then clean & lubricate thoroughly before putting them back together. If the Tension Spring loss its tension characteristic over long usage, the XTR rear derailleur has a second hole on the Pulley's Arm where the Tension Spring can be further stretch to increase its tension. Hence, it is worthwhile to invest in good component which can last for a long time.
When I discovered the chain slacked at the smallest sprocket and chain ring despite having a chain guide and chain tensioner, it was an alarm that my XTR rear derailleur (RD-M980) needed a complete overhaul. The XTR rear derailleur has attached to me through thick and thin, faithfully serving three different bikes of mine; namely Jamis hardtail, Trek Fuel EX, and Santa Cruz Nomad Carbon. It has gone through countless battles under rain and shine, on trails, rock gardens and streams. Besides regular lubrication on the outside after each ride, no major servicing has been done. Finally, the time has arrived for a thorough overhaul!
1. REMOVE THE CHAIN
 Before removing XTR rear derailleur, there are two components that need to be dissembled; the chain and shifter cable. To remove Shimano's chain, you need a chain tool, which can be purchased in any good bike shop. Personally, I prefer SRAM chain as it can be easily de-linked by simply using your hands to unlock the links. I think all chain should make that way. The pain to de-link Shimano chain does not end here, the nightmare starts when you try to link the chain. I will come to that later.
2. REMOVE THE CABLE
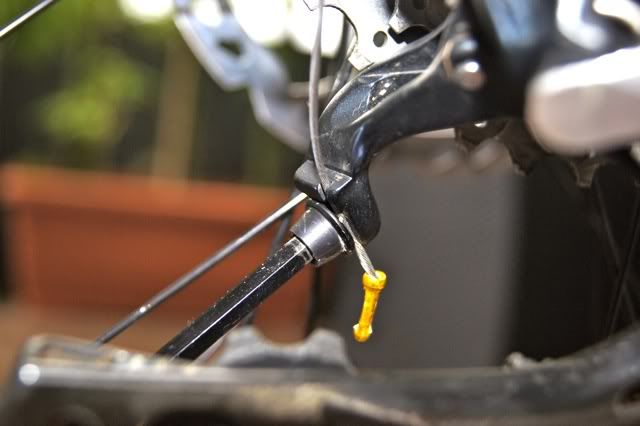 Removing the gear shifter cable is simple. Use the 5mm allen key to loosen the nut, then pull out the cable gently. If the cable has a cable end cap, remove it with a cable cutter. Otherwise, the cable end cap will jam at the cable-guided hole, which will prevent the cable from pulling out of the XTR rear derailleur. For the benefit of maintenance, it is a good practice to leave about 2.5 cm of extra cable at the end, as it will be shortened after each maintenance.
3. REMOVE THE XTR REAR DERAILLUER
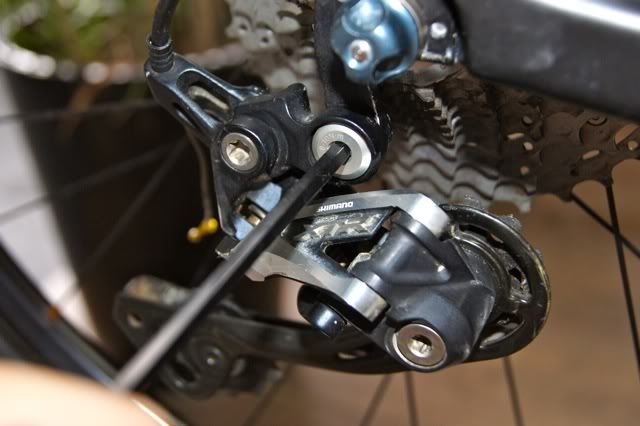 Once the chain and cable have been removed, the XTR rear derailleur can be safely removed from the hanger by unscrewing the bolt with a 5mm allen key. If the rear derailleur has not been removed for servicing for a long time, you will need a great effort to unscrew the bolt, especially if the bolt has not been lubricated properly.
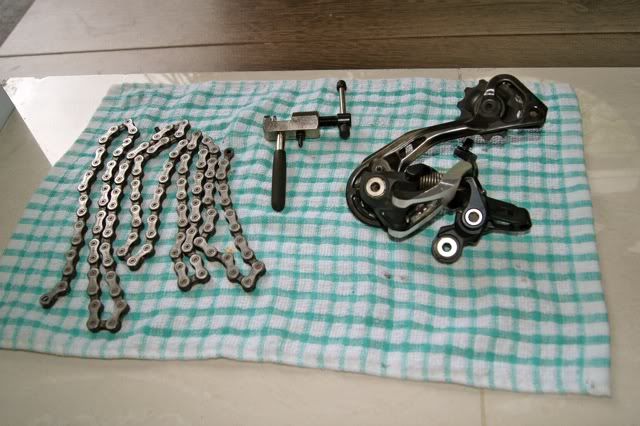 The photo illustrated the two main components removed from the bike: the chain and XTR rear derailleur. I suggest using degreaser to thoroughly clean the chain, then lubricate it with silicon lubricants (dry type). I used FINISH LINE dry teflon lube to grease the chain.
4. DISSEMBLE THE XTR REAR DERAILLUER
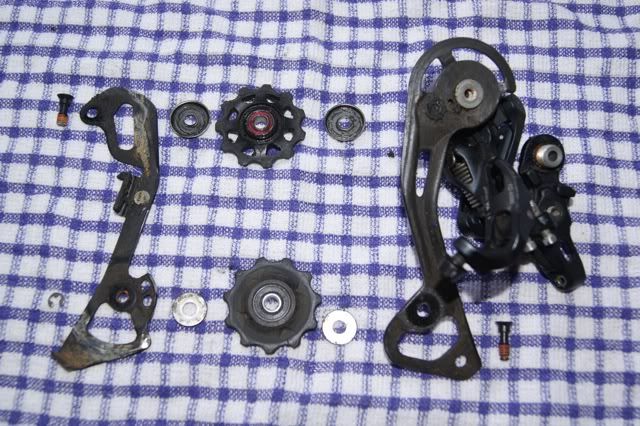 To dissemble the XTR rear derailluer, you must strictly dissemble the unit according to the following sequence: Inner Plate; Guide & Tension Pulley Units; Outer Plate Assembly; P-Axle Assembly; and P-Tension Spring. It is easy to strip the XTR rear derailluer into pieces, as long as you have the patient and interest. To dissemble the Tension Pulley Unit, remember to remove the Stop Ring (above photo:lower left) before unscrewing the bolt with a 3mm allen key. Once the Tension Pulley Unit is dissembled, unscrew the bolt on the Chain Guide Pulley Unit. Take note that the two Pulleys are supported by washers on each side (total 4 x washers). At this stage, the Inner Plate Assembly can be detached from the main unit. If needed, the bearings of the Guide and Tension Pulleys can be easily removed for cleaning and lubricating.
 Once the Tension Pulley Unit and Chain Guide Pulley Unit are removed from the Axle Unit, the P-Tension Spring inside the Axle Unit can be taken out by unscrewing the bolt from the P-Axle Assembly. Remember to hold tight the P-Axle Assembly while unscrewing the bolt, as the P-Tension Spring may bounce the outer-plate away. This photo display the dissembled P-Tension Spring and Outer Plate Assembly. Remember this, how well the XTR rear derailleur work depends on how thorough the P-Tension Spring, P-Axle Assembly and the Outer Plate Assembly are cleaned, lube and installed. Take gentle care not to damage the P-Seal Ring, as it is easily bent. I recommend investing in high quality grease, as it will ensure smooth and long lasting movement and tension. I used FINISH LINE teflon grease, which has high pressure rating, lower wear rating and excellent grade in salt water rust and corrosion test.
 Lay all the components orderly is the manner as shown in the following photo. It will give you a visual image of the whole assembly, and to minimize the possibility of losing the tiny bolts and washers. The above photo illustrated all the dissembled components of XTR Rear Derailleur before they are cleaned and greased. The photo below illustrated the cleaned and greased components of the XTR Rear Derailleur.
 The photo above illustrated the cleaned and greased components of the XTR Rear Derailleur before they were assembled. To assemble the XTR Rear Derailleur, assemble according to the following sequence: P-Tension Spring; P-Axle Assembly; Outer Plate Assembly; Guide & Tension Pulley Units; and Inner Plate.
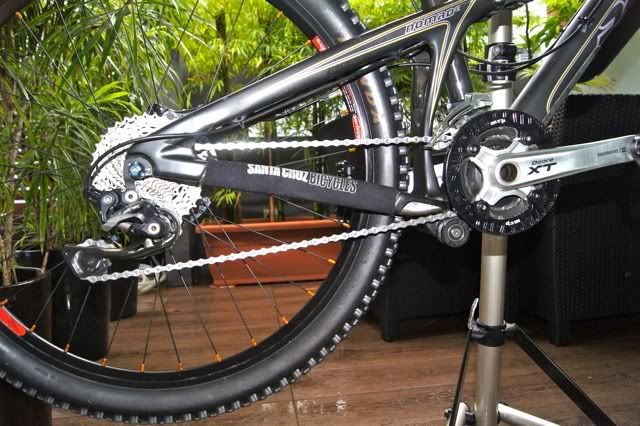 The above photo illustrated the chain and rear derailleur after it was overhauled. The chain was well tension despite the gears being engaged in smallest gears for both the sprocket and chain ring. The gear shift was quick and precise, as good as new! It took me half a day to overhaul the XTR rear derailleur, including removing it from the bike and installing it back after overhaul.
No comments:
Post a Comment